Showing posts with label crochet. Show all posts

Hearts and Stripes Forever

I get quite a few requests on how to make this hat so I thought I would take a minute and share with you my recipe.  


Hearts and Stripes Forever 
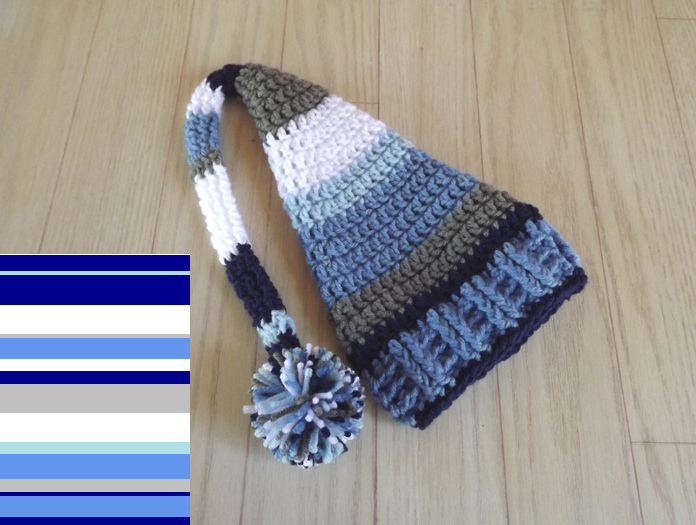
It is really just a basic beanie...I usually use ww yarn and a 5.0mm hook. 
by Christina Ramirez
yarnovercrochet@hotmail.com

I changed yarn colors every other row and just carried it.

Basic Beanie Recipe
Start with 10dc in a loop and pull tight. * If you would like a more fitted beanie I would only work 9dc.

Baby 0-3 months
Finished measurement 14”
In an adjustable ring, ch 2, 10dc and pull to tighten ring
Round 1 Ch 2, 2 dc in each st around (20dc)
Round 2 Ch 2, *dc in next dc, dcinc in next dc* repeat in each st around (30 dc)
Round 3 Ch 2, *dc in next 2 dc, dcinc in next dc* repeat in each st around (40 dc)
*See Below

Baby 3-6 months
Finished measurement 15.5”
In an adjustable ring, ch 2, 10dc and pull to tighten ring
Round 1 Ch 2, 2 dc in each st around (20dc)
Round 2 Ch 2, *dc in next dc, dcinc in next dc* repeat in each st around (30 dc)
Round 3 Ch 2, *dc in next 2 dc, dcinc in next dc* repeat in each st around (40 dc)
Round 4 Ch 2, *dc in next 9 dc, dcinc in next dc* repeat twice more, dc in next 8 dc, dcinc in next 2 dc (45 dc)
*See Below

Baby 6-12 months
Finished measurement 17”
In an adjustable ring, ch 2, 10dc and pull to tighten ring
Round 1 Ch 2, 2 dc in each st around (20dc)
Round 2 Ch 2, *dc in next dc, dcinc in next dc* repeat in each st around (30 dc)
Round 3 Ch 2, *dc in next 2 dc, dcinc in next dc* repeat in each st around (40 dc)
Round 4 Ch 2, *dc in next 3 dc, dcinc in next dc* repeat in each st around (50 dc)
*See Below

Toddler
Finished measurement 19”
In an adjustable ring, ch 2, 10dc and pull to tighten ring
Round 1 Ch 2, 2 dc in each st around (20dc)
Round 2 Ch 2, *dc in next dc, dcinc in next dc* repeat in each st around (30 dc)
Round 3 Ch 2, *dc in next 2 dc, dcinc in next dc* repeat in each st around (40 dc)
Round 4 Ch 2, *dc in next 3 dc, dcinc in next dc* repeat in each st around (50 dc)
Round 5 Ch 2, *dc in next 9 dc, dcinc in next dc* repeat four more times (55 dc)
*See Below

Child
Finished measurement 21”
In an adjustable ring, ch 2, 10dc and pull to tighten ring
Round 1 Ch 2, 2 dc in each st around (20dc)
Round 2 Ch 2, *dc in next dc, dcinc in next dc* repeat in each st around (30 dc)
Round 3 Ch 2, *dc in next 2 dc, dcinc in next dc* repeat in each st around (40 dc)
Round 4 Ch 2, *dc in next 3 dc, dcinc in next dc* repeat in each st around (50 dc)
Round 5 Ch 2, *dc in next 4 dc, dcinc in next dc* repeat in each st around (60 dc)

*Continue alternating color rows until desired length keep in mind that you are going to add a brim and that will probably measure 1.5 to 2 inches

For Brim
Alternate 3 front post double crochet (fpdc) and 2 back post double crochet (bpdc). For maybe 3 or 4 rows depending on size and desired look. * If you only did 9dc at the beginning, then maybe work a 3fpdc, 3bpdc.

Heart pattern: 
lovestitchlove.blogspot.com/2013/01/the-perfect-heart-applique.html

Please feel free to sell any items you make from my patterns but please do not reproduce my pattern as your own.  You do not have to credit me when listing items for sale but if you love it please feel free to tell everyone where they can get one!

The Perfect Heart Applique

The Perfect Heart Applique
by Christina Ramirez

Measures about 3 inches across
Materials: Worsted weight yarn and size H (5.0 mm) hook

In an adjustable ring, ch 2 and dc 11 times.  Pull loop closed.
Row 1    Turn and sc in first st. 2 dc in the next 2 sts.  Dc in the next 2 sts.  Dc, tc, dc in the next st.  dc in the next 2 sts. 2 Dc in the next 2 sts. and sc in the last.
Row 2    Do not turn.  Sl st in ch 2 space to the adjustable loop, sl st in the loop and sl st back up to the beginning of the row in the dc from the first row (total of 3 sl sts)
Sc in first sc from Row 1. 2 sc in the next st. Sc in the next st. 2 sc in the next st. Sc in the next 4 sts. Sc, hdc, sc in the next st. Sc in the next 4 sts. 2 sc in the next st. Sc in the next st. 2 sc in the next st. Sc in the last st. Sl st the next 3 sts to take you back to the adjustable loop.  Tie off and pull tail through loop.


Please feel free to sell any items you make from my patterns but please do not reproduce my pattern as your own.  You do not have to credit me when listing items for sale but if you love it please feel free to tell everyone where they can get one!

Downtown Yarn Bombing!

So my local yarn store, Bella Filati, coordinated an awesome yarn bombing of my downtown for their annual participation in the Palustris Festival.

It does my heart good to see that there are so many fun yarnies in this small town...It made my morning!  I only wish that I had had time to join in. :(  Hopefully next time!

So I thought I would share some of the pictures!  Some of the designs coordinate with the shop that is in front of...they thought of everything!


Knitting Practice

So...I have been wanting to learn to knit for the longest time.  Don't get me wrong...I LOVE to crochet.  But the yarn industry seems to cater to the knitters of the world and designs all these beautiful yarns that just look fabulous knitted and a little wonky crocheted. :(  So what's a yarnaholic supposed to do?

I have taken knitting classes and I have watched the videos online but practice makes perfect and if you are crocheting all the time, then you just tend to put off the knitting.  Well I have come up with an excuse to knit!  I have started working on pom pom mini blankets. 


I recommend it for anyone that needs the knitting practice.  The hardest part about these things is starting it...but once you get over that, it is a breeze.  Not only is it making me practice the knit stitch, it is helping me to keep the stitches somewhat even because you can only go so far before you run into a pom pom.  I have a few more in the works right now so maybe I will figure out hats and booties by the end of the year.  :)

Behind bars...of color, that is!

Ok...so I had a friend that wanted a long tailed elf hat...no problem. She specified as much to say "boy colors"...hmmm...so that leaves me with many possibilities.

Most of the time these hats seem to be solid or striped...ok so that narrows it down a smidgen. So now what? I remembered seeing a pin on evil, addictive Pinterest for a stripe generator from Biscuits and Jam so I thought I would try it out. Of course I was skeptical that what I could generate would look as good in practice.

I picked my colors: boy. I picked how big I wanted the rows. And finally, I told it how many rows I had to work with. So then it generates a pattern for me...I had to refresh a few times to get one that I liked, but there you go...done!

I copied and pasted to a Word doc so that I would have it to refer to.


So here is what I got...


I love it! I am going to have to do that more often. I think the hardest part is picking colors that will look good together. It seems easy until you put them together and generate stripes.

Happy striping everyone!